A Guide to Registering and Managing Your Suppliers
Keeping track of supplier information — contact details, addresses, and order histories — can be a challenge when it's scattered across emails, notes, and old invoices. Centralizing this data in Veetz not only simplifies your procurement process but also builds a reliable database for your clinic's operations. A well-managed supplier list is your first step towards smarter inventory control and stronger business relationships.
This tutorial will guide you through the process of adding and managing your suppliers within Veetz, ensuring you always have the information you need right at your fingertips.
How to Find the Suppliers Section
Suppliers live inside the product workspace, alongside the other tables that support your catalog:
- In the main sidebar, click Products.
- In the product workspace, open Auxiliary tables.
- Select Suppliers.
This will take you to your supplier list, where you can see all your registered contacts and companies. To add a new one, click the green + ADD NEW button.
Auxiliary tables also holds Manufacturers, Product Lines and Categories. Filling these in before you build your catalog means every product you create can be classified properly from the start, instead of being tidied up later.
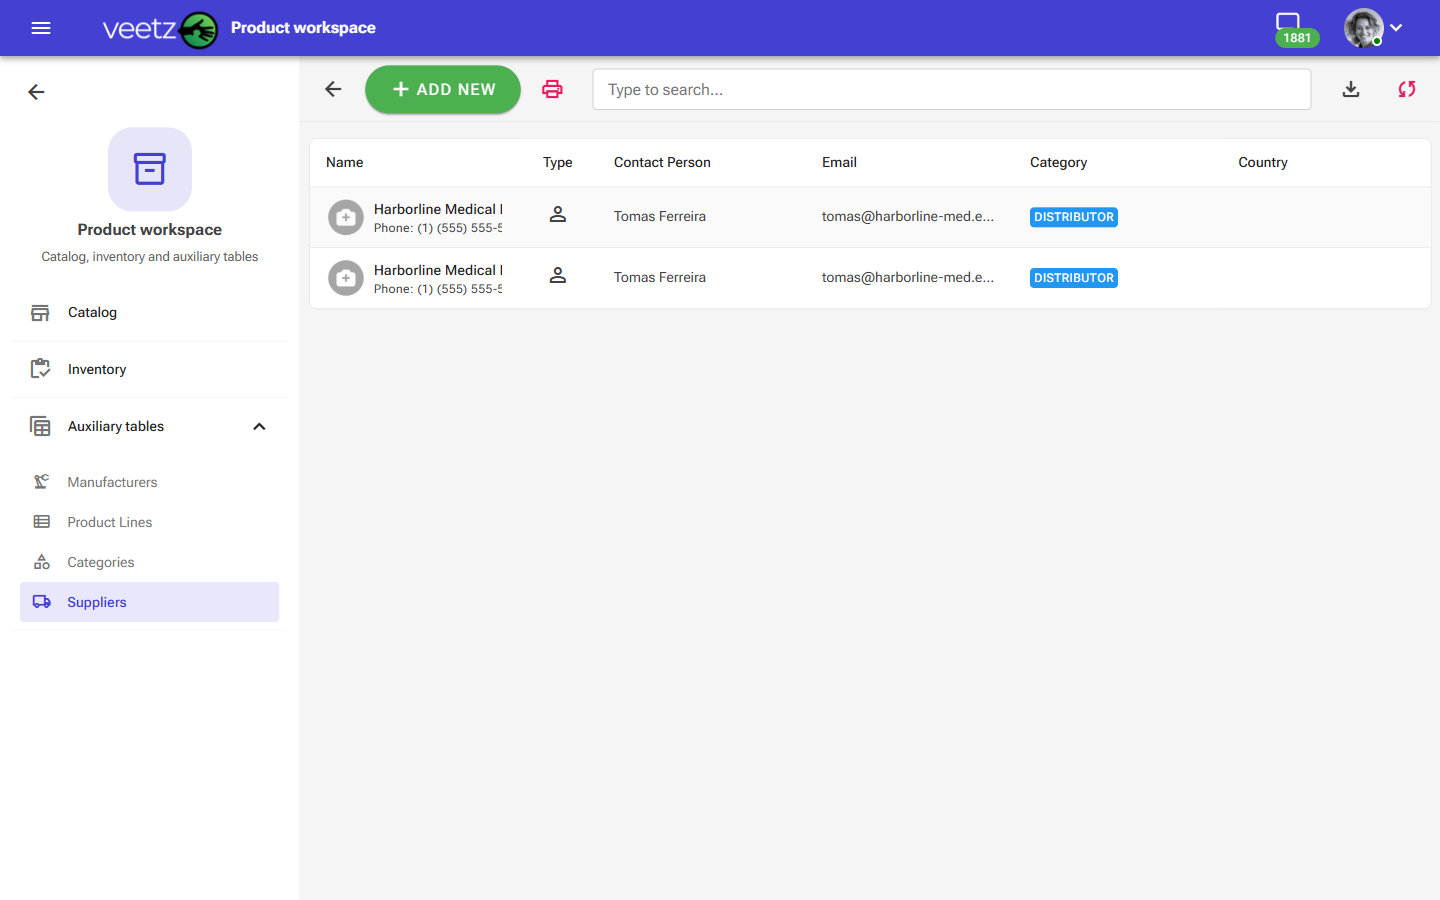 Image: The main screen listing all registered suppliers.
Filling Out the Supplier Details Form
The supplier form is designed to capture all the essential information in a clean, organized way. Let's walk through each field.
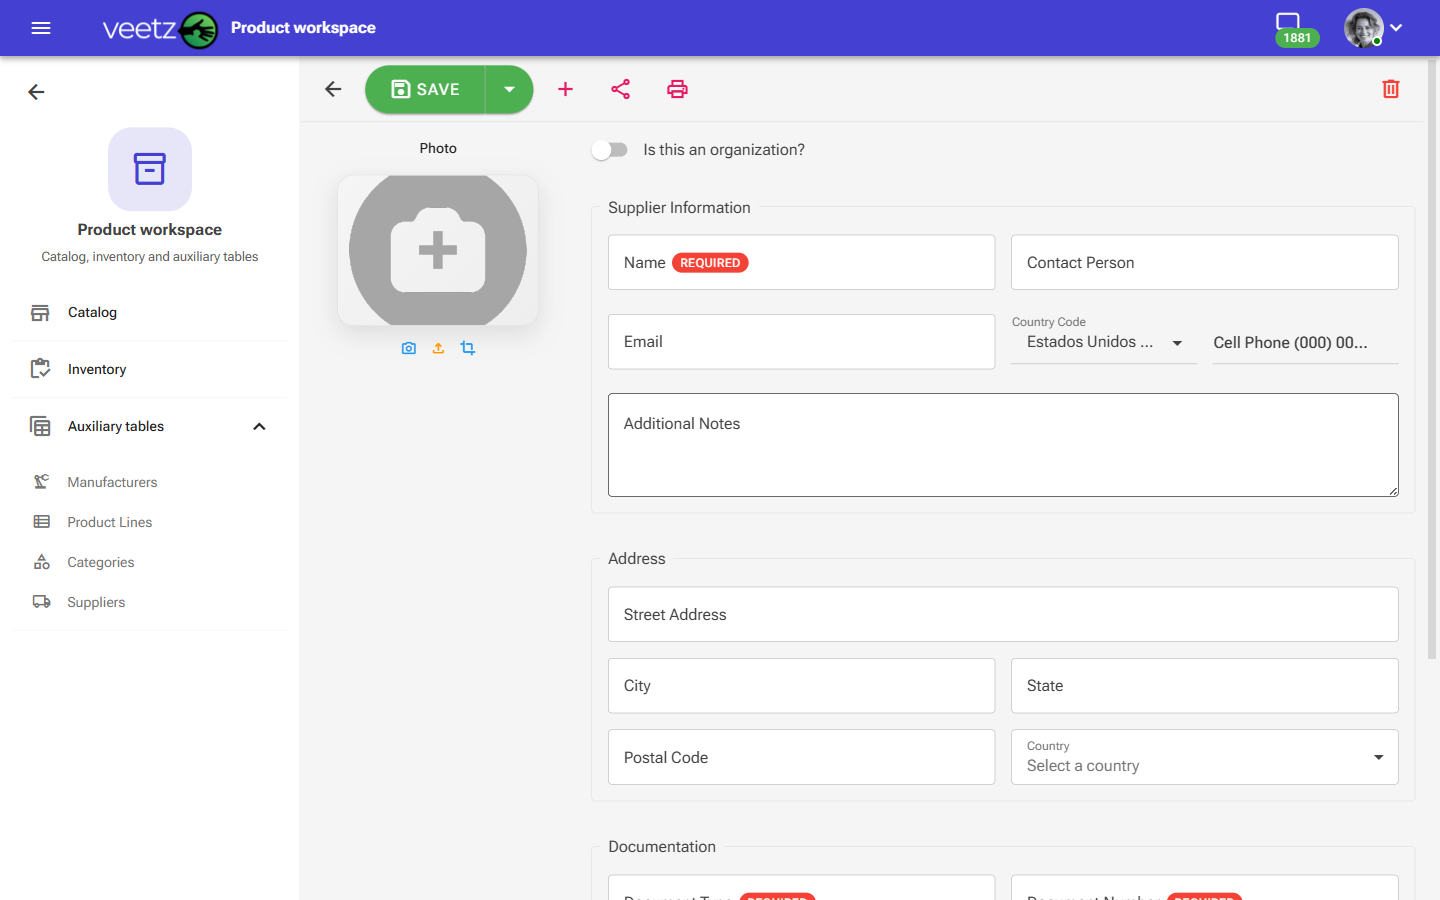 Image: The form for adding or editing supplier details.
Veetz will not save a supplier until Document Type and Document Number are filled in, along with the supplier's Name. If you click SAVE and nothing seems to happen, scroll through the form — the missing fields are marked in red with a short message underneath.
- Photo: Upload a logo or image for the supplier. This visual cue makes it easier to identify them in the list at a glance.
- Is this an organization?: Use this toggle to specify whether the supplier is a company or an individual (like an independent sales representative). This helps tailor the available fields.
Supplier Information
This is the core contact information for your supplier.
- Name: The official name of the company (e.g., "HealthyPaws Pharmaceuticals") or the full name of the individual contact.
- Contact Person: The name of your primary contact at the company (e.g., "Sarah Thompson"). This is the person you typically call or email for orders.
- Email: The direct email address for placing orders or asking questions.
- Country Code & Cell Phone: The primary phone number for the supplier.
- Additional Notes: A flexible space for any extra information you need to remember. This is perfect for things like account numbers, specific ordering instructions, or delivery days (e.g., "Supplier of veterinary vaccines and medications. Orders must be placed before Tuesday for Friday delivery.").
Address
Enter the physical or mailing address of the supplier. This is useful for correspondence and for understanding shipping origins.
- Street Address
- City
- State / Province
- Postal Code
- Country
Document
This is how your clinic identifies the supplier on invoices and in your bookkeeping — and it is the section people most often skip, only to find the form refusing to save.
- Document Type: Required. What kind of identifier you are recording — a tax identification number, a business registration number, or whatever your country uses.
- Document Number: Required. The identifier itself, exactly as it appears on the supplier's invoices. Copying it correctly now saves your bookkeeper a phone call later.
- Issuer: The authority that issued the document, when that matters in your country.
Commercial Details
- Supplier Type: How this supplier fits into your supply chain — a manufacturer, a distributor, a local reseller. Useful when two suppliers carry the same product and you need to remember which one is the source.
- Bank Details: Payment information for this supplier, kept in one place instead of buried in an old e-mail.
Saving the Supplier
Once you've filled in all the details, click the green SAVE button in the top toolbar. A confirmation appears reading Supplier Saved!, and the supplier joins your list — ready to be linked as a Primary Supplier when you add or edit items in your catalog.
Next Steps
With your suppliers registered, you can now link them to products and services in your catalog. See our tutorial: Managing Catalog Items.
If you encounter any difficulties during this process, do not hesitate to contact our support.